- HubPages»
- Arts and Design»
- Graphic Art & Design»
- Design Software
Tutorial for manual blending an image with a high dynamic range: example image from Purisima Creek Redwoods

Hi again, folks. In this tutorial I give another example about how to go about manual blending for high dynamic range scenes. High dynamic range scenes are both the hardest scenes for blending multiple exposures together, as well as the most necessary for doing so. The difference in brightness between different portions of the scene makes it imperative to use multiple exposure in order to capture the view the way saw it in person, but a sloppy blend can make the image look unnatural, or downright bad.
Many people have begun to use automated HDR software, which I think can produce some very nice, artistic results, but if your goal is to make the scene look more natural, automated software is not usually the way to go. It can make the shadows too bright and the highlights too dark, making the result completely devoid of contrast, while one of the original defining traits of the scene was an excess of contrast.
Manual blending gives the artist more ability to keep the contrast of the scene, leaving some areas much brighter than others, while still making sure to maintain details in the shadows and highlights. But this method needs to be mastered before it can necessarily produce great results. Keeping tabs on the shadows and highlights of the original scene can make or break an image. I see dozens and dozens of blended images where one object, for instance a mountain, is much brighter than an object it should be darker than, for instance the sky. This results from the darker mountains being brighter in the long exposure than the brighter sky is in the short exposure. The resulting blend, while successfully having detail in both sky and foreground, is backwards in terms of what should be bright and what should be dark. Hopefully, this tutorial will give you some tips to help towards mastering exposure blending without falling into some of the common pitfalls!
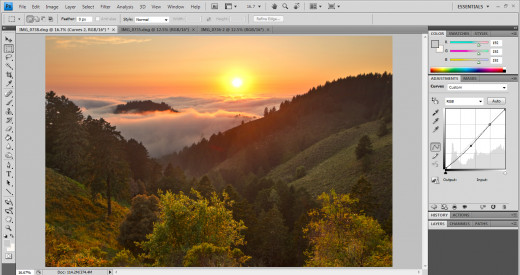
Whittemore Gulch, Purisima Creek Redwoods
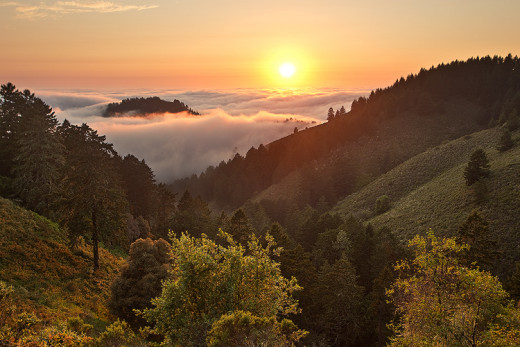
This particular tutorial is using a photograph I took on Whittemore Gulch Trail, in Purisima Creek Redwoods of California's Bay Area. Scenes like this can be tricky blends. The sky is bright with the setting sun, the fog is also bright because it's white and reflecting the sunset. Then there are the mountains, which immediately touch the fog and yet are quite a lot darker than the fog. To make it tougher, there are trees which are also dark but jut upwards into bright portions of the scene. Finally, the mountains are steeply sloped, meaning graduated ND filters are not an option. Because of these difficulties, I felt this image would be a good one for this tutorial.
Process 3 Different Exposures in Adobe Camera Raw
For this blending, I began with three different exposures, shot from the exact same position on a tripod (this is important so that all the little details line up in each exposure). I find I can often get slightly better blends from using a single RAW image, if the dynamic range of the scene allows for it. This one was a bit too contrasty though, and so I took three different exposures: 1/100th s, 1/30th s, and 1/5th s (all at f/13).
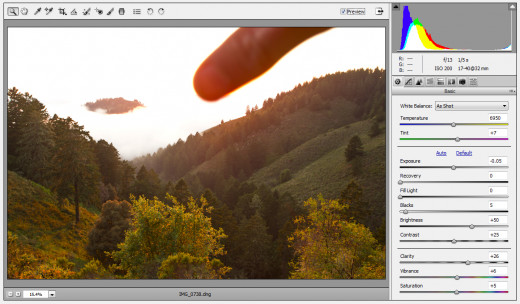
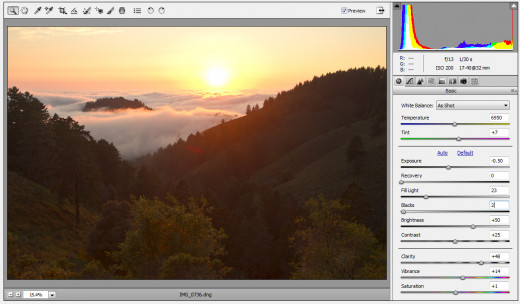
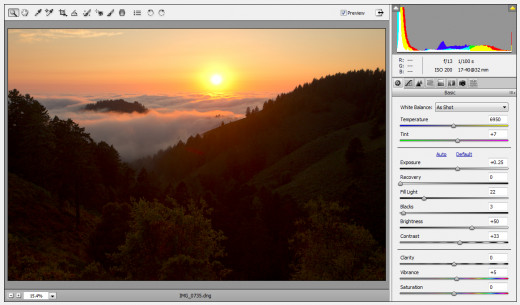
Below are the settings I used in Adobe Camera Raw (ACR) to process each exposure. The most important thing to notice is that one image is processed to taste for the sky, one is processed to taste for the foreground, and the third (middle) exposure is processed to taste for neither, but is meant to split the difference between the two. This is important because this middle image can be pushed to look like either of the other two without too much loss of detail. I changed the contrast style in RAW to "linear," which reduces contrast a lot, making sure you get tons of detail in both the shadows and highlights.
Also, you'll certainly notice my thumb in the brightest of the three exposures :) This is a trick I learned - if you block out the sun with your finger, you'll get far fewer flares. Since this image is only for the foreground, it doesn't matter if my thumb blocks part of the sky.
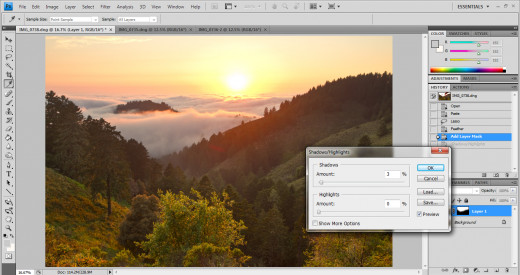
Blend the middle exposure with the light exposure (foreground)
The next task for me was to blend the middle exposure, which will be used for the transition region from the dark portion to the light portion, with the longest exposure, which will be used for the foreground. For this, I pasted the middle exposure into a layer on top of the longest exposure. I then selected the sky and a healthy buffer of mountains, feathered this selection with a nice meaty feather (200 px), and let this only this selection show by doing Layer -> Layer Mask -> Reveal Selection. I now see that the tops of the mountains, which are part of the top layer, are a little bit darker than they should be. To adjust for this I use the shadows portion of the Shadows/Highlights tool on this top layer (the middle exposure), until the mountains look natural and consistent between the two layers.

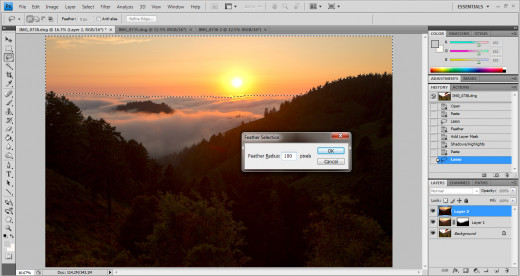
Blend dark exposure (sky) with middle exposure
How that we have the middle exposure blended with the bright exposure, and have a good looking foreground, it's time to get the sky looking good too. This ended up being a lot simpler than I thought it would be. I first paste the darkest exposure as a new layer, so it is now the topmost layer. I then select the sky roughly with the lasso tool, and give it a good feather, though not as big as the last one. I chose 100 pixels. Then I reveal just his selection by doing Layer -> Layer Mask -> Reveal Selection. I was expecting to have to touch this up with a low-opacity brush tool applied to the layer mask, as is usually necessary to improve the blending in certain locations, but it actually was just fine as is, so it's time to move on to fine tuning!
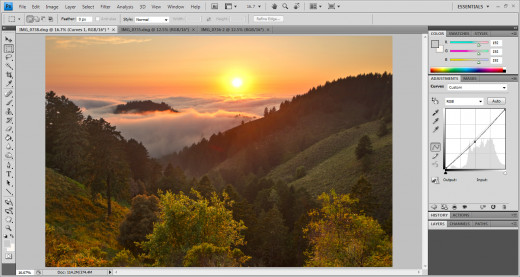
Add curves adjustment layer to each of the three exposures
Now that I've blended the three exposures, it's time to take the image to a new level by applying a curves adjustment layer to each of the three exposures. The curves adjustment to the top layer (sky) and bottom layer (foreground) will make each of those portions look better to my tastes, but the curves adjustment layer to the middle layer is the most important. This middle exposure is showing only at the interface of the sky and the foreground, where the blending occurs. The curves adjustment can help it both match the foreground better as well as the sky better, and make the blending virtually unnoticeable.
The three curves adjustment layers are shown before. In the top picture, which is my adjustment to the sky layer, you'll see my curves adjustment is not the standard s-curve, but rather just a darkening. This helped the sky pop, and didn't wash out the area surrounding the sun too much.
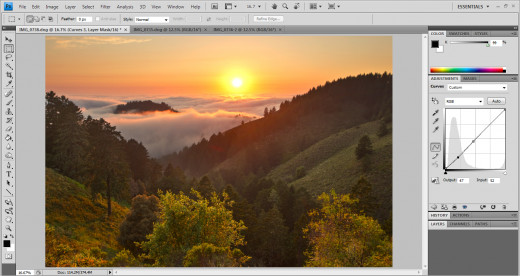
The second image, which is the for the curves adjustment to the foreground, is just a slight darkening of only the dark tones, and no adjustment to the bright tones. The foreground already looked pretty close to what I wanted, and didn't require much tweaking
The third image, which is for the adjustment to the middle exposure, was also a darkening of only the dark and mid tones, with no adjustment to the bright tones. Again, this was done to make the showing fog/sky part of the layer match the top layer, and make the showing foreground portion match the bottom layer. This really pulls the image together into a cohesive whole.
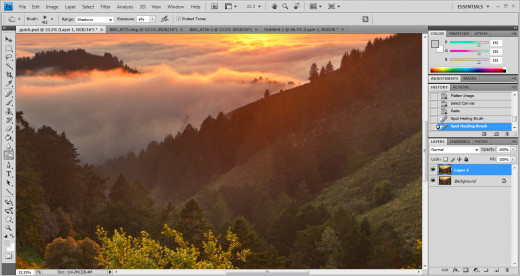
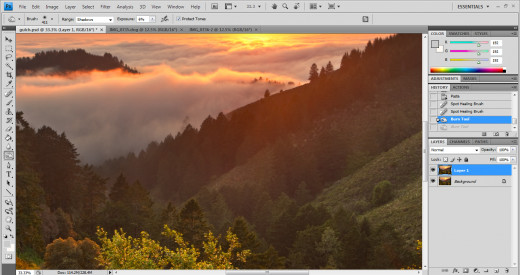
Final touch-ups: burn tool
Well the image is pretty much done, I now just look it over for some final touch-ups. The only thing I see is that at the bottom of the "V" formed where the two hillsides meet, the valley seems a bit lighter than it should. This could be real, due to a light layer of fog, or it could also be a relic from the blending process. Regardless, I don't like it, so it has to go. For this all I do is a quick pass with the burn tool, set to a 6% burn set to "Shadows" range. Before and after are shown below. It might be hard to see the difference at this size, but it's a subtle change that makes a big difference.
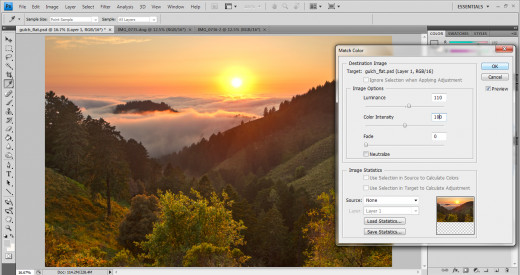
Final touch-up: match color
Once I'm done with the image, the last set of things I do is mess with the "match color" tool, as well as with the photo filters, to see if I can achieve a color balance that I like better. I didn't find any benefit to using the photo filters, so I didn't use them on this image, but I did find a benefit to using the "match color" tool. I often use the color intensity slider, but I didn't like what it did to this image. For this image, I only used the luminance slider, and only slightly. Again, another subtle difference, but the subtle differences add up!
Ok folks, that's it! At this point, the image is a finished product! Time to upload it to all the places where I post/sell my photographs! I hope you enjoyed this write-up, and feel free to ask me any questions.


